| Active Directory Hacking | Initial Enumeration |
The First Steps
Welcome to the first post of my Active Directory hacking and hardening series. This post will cover reconnaissance techniques that pen-testers perform to enumerate the structure and configuration of domains. It’s a critical first step attackers take when they lack an initial login credential. Enumeration also happens post-compromise, but that will be covered in a later post.
Open-source intelligence gathering typically allows attackers to gain information about an organization’s digital footprint, including domain names, email addresses, employee names, and even organizational structure. Let’s assume we were able to discover the subnet a company uses for critical infrastructure. This alone should be enough to sniff the network and discover internal services, open ports, live hosts, and IP addresses.
I’ll be using the subnet that I setup my lab on. Switch it out for your own use case. We will, of course, need an attack machine. I’ll be using an existing Kali VM I have.
10.10.20.0/24
Enumeration Tools Rundown
Besides using Nmap to scan ports, services, and operating systems, here are the particular services we will be enumerating. They all play a role in certain key exploits.
| Service | Enumeration Method | What You’ll Get |
|---|---|---|
| NetBIOS | nbtscan, nbmlookup |
NetBIOS names and details |
| DNS | dig, dnsenum |
DNS and service records, zone files |
| SMB | smbclient, netexec, openssl |
SMB shares, SMB signing policies, share data |
| LDAP | ldapsearch |
Directory structure, SAM users, groups |
Enumerating Network Endpoints via NetBIOS
Personally, I like to start my enumeration by searching for the NetBIOS names for all hosts on the subnet. NetBIOS is an old name resolution protocol that has largely been replaced by DNS. Typically, NetBIOS over TCP/IP should not be enabled, but sometimes you might get lucky.
We can use a Linux command-line tool called ‘nbtscan’ to bind to UDP port 137 and scan for NetBIOS names.
nbtscan -r -v <X.X.X.X/X>
This will give us a formatted name table for all the hosts.
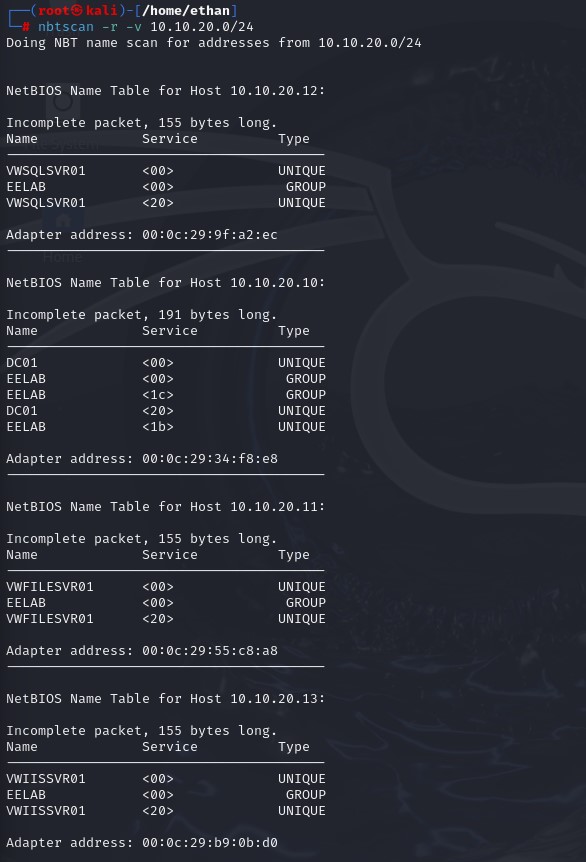
These tables not only give the NetBIOS name but also the network adapter MAC address, type, and the service tags.
The unique type indicates that this machine is distinct and identified individually, while the group type tells us that the device belongs to a group of similar services or devices. If something has the group type, it likely belongs to a domain.
Service tags denote different roles that NetBIOS hosts are associated with:
<00>: Workstation or Server service
<1c>: Domain Controller service
<20>: Server service (file and print sharing)
<1b>: Master Browser service
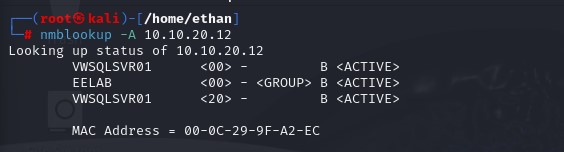
Additionally, the Samba suite has a command-line utility called ‘nmblookup’ which performs a similar task.
Say you were only able to gain a single IP address from OSINT gathering. You can use the following command to query the NetBIOS name associated with that IP.
nmblookup -A <X.X.X.X>
Mitigation
- Disable NetBIOS over TCP/IP for each domain system.
- Close NetBIOS TCP/UDP ports on the firewall using group policy.
Scanning DNS for Fully Qualified Domain Names
FQDNs are the complete domain names that specify their place within DNS. An example is your basic web address, www.example.com. It has the host name (www), domain name (example), and top-level domain (.com) to form a full FQDN.
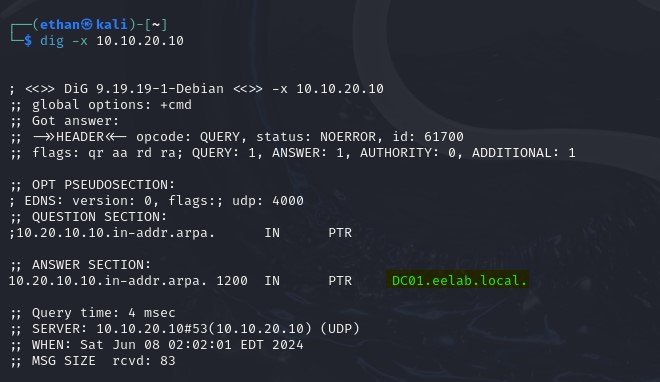
Dig is a command-line tool that we can use for reverse DNS lookups. We can execute the following command:
dig -x <X.X.X.X>
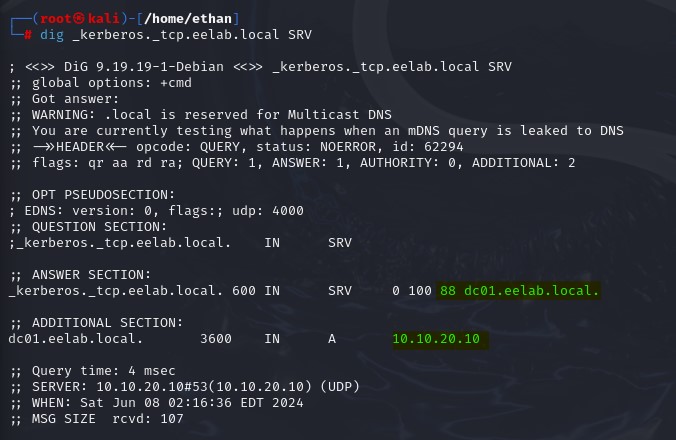
We can also do some deeper investigation with this tool to dig (booooo) up service records. Here I will target Kerberos with the following command:
dig _<Your_Service>._tcp.<Your_DomainName> SRV
Under the answer section, we find that Kerberos is operating on port 88 on the host server. It’s a domain controller, and even if we couldn’t tell by the FQDN, only domain controllers really use port 88. The additional section also gives us the IP address of the domain controller.
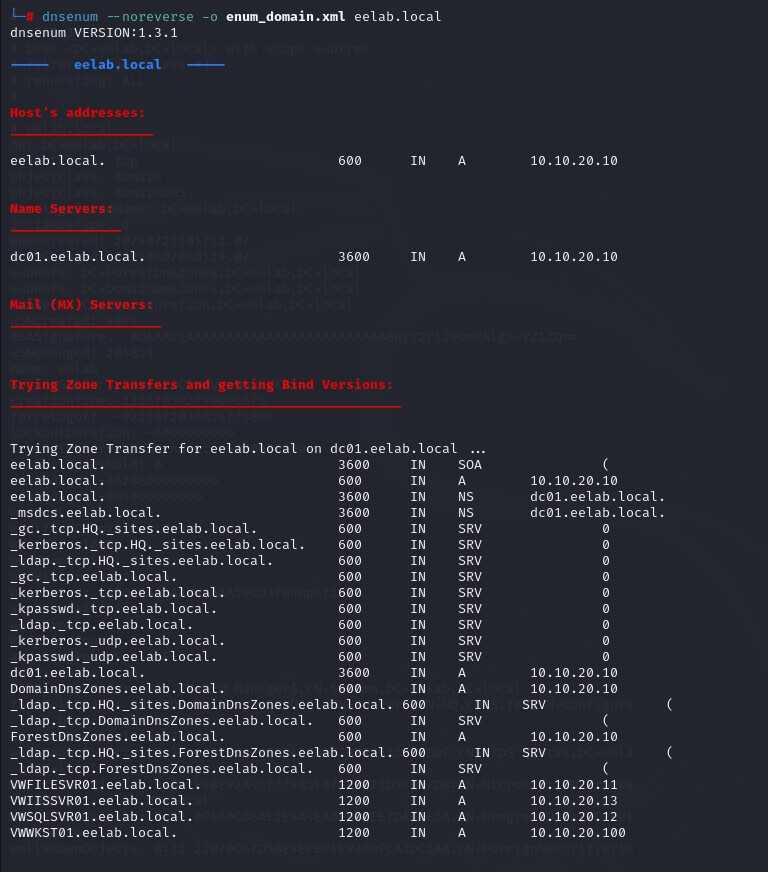
If we don’t want to do a simple reverse DNS lookup, we can use a more powerful Perl script called dnsenum. It will allow us to differentiate between the different kinds of DNS records and perform zone transfer/AXFR queries to get the zone information.
dnsrecon -noreverse -o <Your_OutputFile>.xml <Your_FQDN>
We get a lot of information. dnsenum will automatically separate records based on type. The ‘A’ indicates we have an IPv4 address. The zone transfer gave us an interesting view into the domain structure. We can see which services belong to which servers, their FQDNs, record types, and IP addresses.
Mitigation
- Disable zone transfers to any server. If you need them, use the DNS manager to specify certain IP addresses.
Port Scanning and OS Fingerprinting
Nmap is one of the almighty open-source tools that every offensive security professional or hobbyist needs to know. It’s great for scanning and auditing networks with a great deal of fine-tuned control. We can use the following command:
nmap -Pn -p- -sV -O -T<0-5> -sC -vv <Your_TargetRange> -oN nmap_ad_scan.txt
Here’s an explanation for what each option does:
-Pn: Scan without host discovery. We already know they’re up and this helps avoid network noise.-p-: Scans all 65,535 TCP ports rather than the standard top 1000. This takes a good bit of time, but gives the most information. I’ll skip this step to save time.-sV: Determine the version of the services running on open ports.-O: Detects the operating system of the target.-T<0-5>: Sets the timing template. Timing goes from 0-5 with 0 being the stealthiest and 5 being the fastest. Attackers will want to go lower to avoid detection, but pentesters might go higher if they’re doing a fast and dirty pentest. I’ll set it to 5 to speed things along.-sC: Uses default scripts to gather additional information during the scan.-vv: Gives the most verbose output possible as the scan progresses, including time remaining.<Your_TargetRange>: Specifies the subnet, IP address range, or single IP address you want to target.-oN nmap_ad_scan.txt: Specifically outputs scan results in a normal, human-readable format to the filenmap_ad_scan.txt.
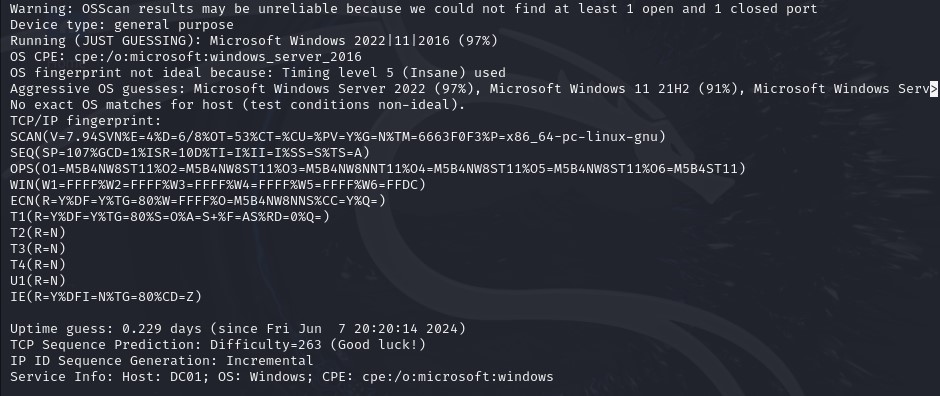
There is too much output to show all of the scan capture, but here is a snippet that reveals some of the open ports and services along with an SSL certificate for LDAP.
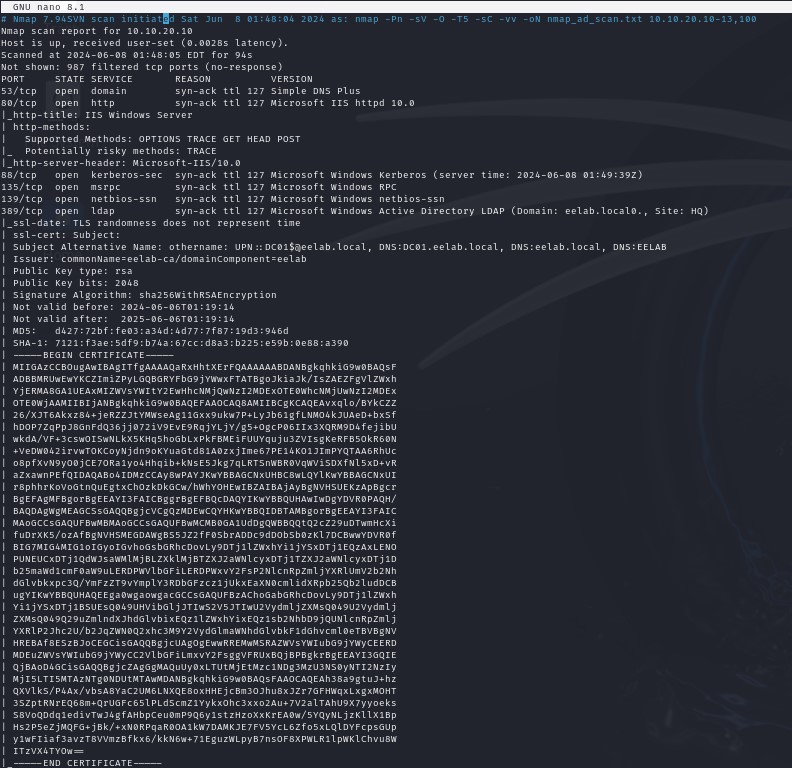
This snippet reveals OS information. The results will be less accurate the higher the timing template, so keep this in mind if you want the best results.
Mitigation
Nmap scans aren’t really preventable. Attackers can and will scan your networks, but solutions are available to make scans more difficult for attackers.
- Network segmentation and DMZ deployment
- Configuration of robust alerts on IDPS
- Deployment of secure host-based firewall rules
- Secure port management
SMB Null-Sessions
Server Message Block is a protocol that is used for file sharing. It’s likely you might find file shares that use SMB on devices like domain controllers or file servers. If anonymous login is configured for a server using SMB, then it is possible to login without credentials in what is known as an SMB Null-session, or an unauthenticated session.
We can use a command-line tool called smbclient to test for null-session authentication on a target machine. Newer versions of Windows server use SMB3 by default. Make sure to specify the SMB version that matches the operating system of your target machine.
smbclient -L //<X.X.X.X> -N -m SMB<X>
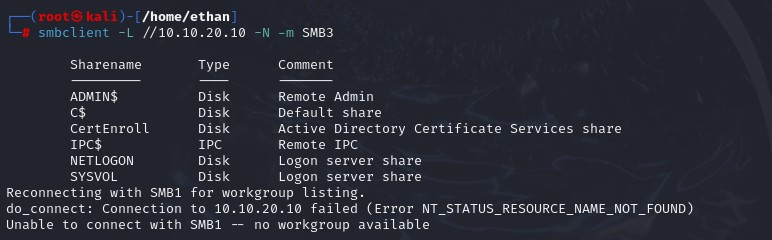
It looks like we were able to successfully connect without logon and list the shares. Workgroups can’t be listed because SMB1 isn’t enabled on the target machine, but that is not important.
It’s possible to connect directly to a share. CertEnroll is a share that is automatically created when a server has certificate services enabled. Let’s try to connect to it using a null-session.
smbclient //<X.X.X.X>/<Your_Share> -N -m SMB<X>
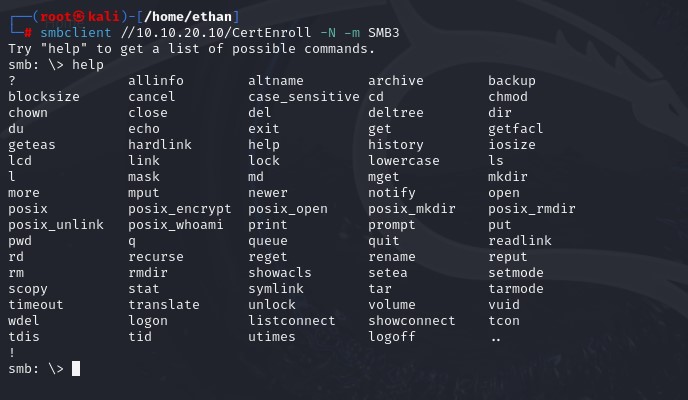
It successfully connected us to the share! We can use the help command to list all of the commands we can execute on this share. It looks like anonymous users might have full permissions for this share, which is a security risk.
Let’s list the contents of the CertEnroll share with ls.
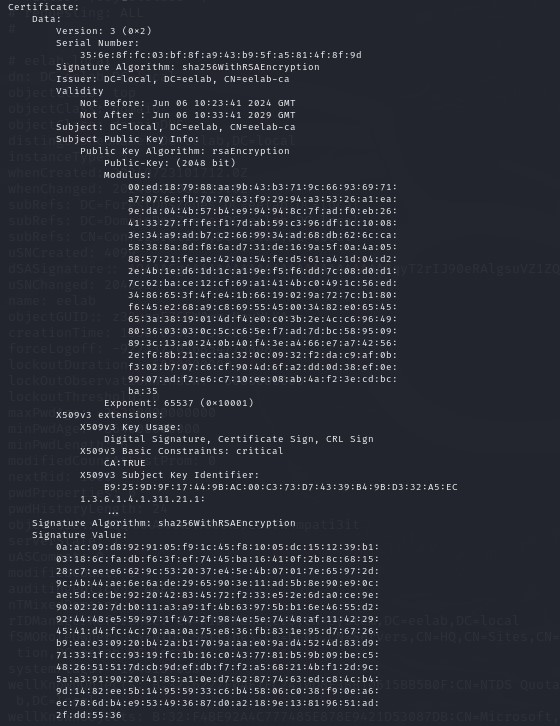
We can see the public certificate for the certificate authority here. If we were able to enumerate the associated private key, we could impersonate the CA and attack the trust chain to issue fraudulent certificates.
You can download a remote file to your local machine using the get command. Let’s steal the certificate file.
get <Your_Remote_Cert_Name.crt> <Your_Local_Cert_Copy.crt>
openssl x509 -in <Your_Local_Cert_Copy.crt> -text -noout
Here’s what OpenSSL does:
x509: Tells OpenSSL that you are working with an X.509 certificate. Most Microsoft certs are based on this standard.-in: Specifies the input file.<Your_Local_Cert.crt>-text: Tells OpenSSL to display the certificate in a human-readable format, including information like the issuer, subject, validity period, and public key.-noout: Prevents OpenSSL from outputting the encoded contents of the certificate. Without-noout, OpenSSL would print the encoded certificate along with the decoded text information.
We now have the root certificate information in a human-readable format.
SYSVOL is another important share to enumerate as it contains group policy objects and configuration scripts. Also keep an eye out for other custom shares on the DC and other file servers.
Mitigation
- Disable SMB null-sessions through group policy creation.
- Disable share permissions for unauthenticated users if the first strategy is not an option.
Checking For Unsigned SMB
We also should check for SMB signing on each machine on the subnet. SMB signing adds cryptographic signatures to SMB packets using the session key for greater security. Typically, SMB signing is enabled by default on modern Windows operating systems. Despite that, sometimes SMB signing will be disabled through configuration tweaks. This is a major security vulnerability.
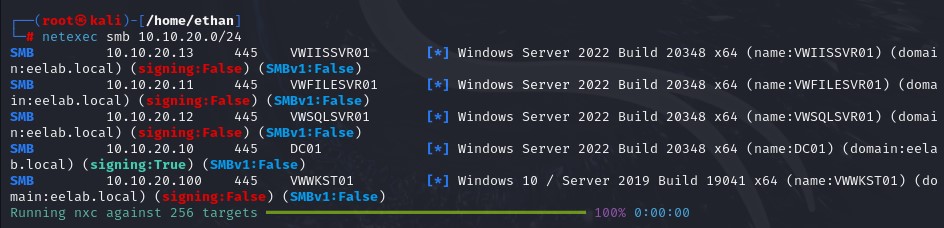
NetExec, F.K.A CrackMapExec, is a command-line tool used mostly for post-exploitation purposes, but it also has SMB commands that are useful for pre-exploitation tasks. Let’s use the following command:
netexec smb <X.X.X.X/X>
This command lists each device and their SMB signing behavior. It appears most devices don’t require signing.
Additionally, SMB signing can be enabled but not enforced. We can check the SMB signing enforcement policy with Nmap.
nmap -p 445 --script smb2-security-mode <X.X.X.X>
As we can see, SMB signing is not enforced on the target server. Enforcement being optional leaves the device just as vulnerable as if it didn’t have SMB signing at all. We will exploit this later on.
Mitigation
- Don’t create group policies that disable SMB signing. Always keep ‘Digitally sign communications (always)’ enabled.
- Disable ‘Digitally sign communications (if client agrees)’ for servers and clients to avoid optional signing enforcement
Anonymous LDAP Binding
Finally, we are going to enumerate some usernames. The Lightweight Directory Access Protocol (LDAP) is used for quickly updating, querying, and authenticating to directory services. It has a hierarchical tree structure exampled below.
Root
│
dc=example,dc=com
│
├── ou=People
│   ├── uid=john.doe,ou=People,dc=example,dc=com
│   ├── uid=jane.smith,ou=People,dc=example,dc=com
│   └── uid=bob.jones,ou=People,dc=example,dc=com
│
├── ou=Groups
│   ├── cn=admins,ou=Groups,dc=example,dc=com
│   └── cn=users,ou=Groups,dc=example,dc=com
│
└── ou=Devices
    ├── cn=device1,ou=Devices,dc=example,dc=com
    └── cn=device2,ou=Devices,dc=example,dc=com